|
"If cutting a barrel down is so great, wouldn't everybody be doing >that? Stick with a full length barrel." I think many people are satisfied with their barrel and don't want to mess with success. Others may be afraid to screw-up a good barrel. Anschutz did not send the 2013 to market without more than a little research. The first two made actually had 15-inch barrels (yes, they were technically what the BATF would consider class-3 weapons). Norbert (the Anschutz gunsmith) fired a 598 UIT prone course with the first 2013 as soon as he finished assembling it. The 19-inch barrel came later. The success of the 2013 suggests that its 19-inch barrel works just fine. >It doesn't make much sense if the reason for cutting the barrel down is to > get the bullet out faster so it has less chance of barrel movement > affecting the flight of the bullet. > This is true. Some rough math: the bullet moves through the barrel at about 1000 feet per second. The barrel is about 2 feet long, so it takes the bullet about 1/500th of a second to pass through it once it starts moving. Every 6 inches cut off the barrel decreases the bullet's barrel-time by about 1/2000th of a second. Let's assume you're shooting prone. Your pulse beats once every second, and each time it moves the barrel 5 millimeters on a 50 meter target, which means your pulse moves the barrel 5mm/sec. 5mm/sec times 1/2000th of a second equals 0.0025mm less error on the target from having a barrel 6 inches shorter. Now, let's assume you're shooting standing and have a big hold that swings across the target at a rate of 50mm/sec. The shorter barrel will give you 0.025mm less error on the target. Bottom line: even the worst hold will not benefit from a shorter barrel. >Cutting a barrel down for weight and balance or maybe even barrel > harmonics makes more sense. > You bet it does. Try a free rifle with a shortened barrel sometime and see how nice it is to shoot standing. My free rifle is a custom-job with a 20 inch barrel and a very-light 20 inch sight extension tube. The balance is much nicer than the factory-spec Anschutz 1813 I used to shoot. Cutting down a great-shooting Hart barrel took some courage, but the results were worth it. In addition to balancing well, the rifle shoots fantastic groups -- chopping off 6 inches didn't hurt accuracy a bit and may have improved it. Additional note: For shooters considering re-barrelling their rifles, try having the existing barrel re-chambered and re-crowned, and have it cut to whatever length (longer than the 16 inches required by law) you'd like to try. Re-chambering and re-crowning are often all that is needed to make a .22 barrel shoot well again, and they're a whole lot cheaper than having a new barrel installed. back to top ^
Concerning the coloured covers for the rear iris: I first saw them on Centra. I have no any personal experience, but a few of my fellow shooters tested them. They were pretty sceptic at first: "another gimmick merely invented to make us spend more money", "it will only make my rifle look better, but I won't improve my performance". After just 1 evening of trying it, they were ready to buy them. They really felt that the coloured ring helped in keeping the eye centred with the diopter. Rather than just having a little black hole you're looking through, you get another ring that you can easily centre with the front sight and the target. So that's why you might want to try 1 coloured ring. Remains the question: why a set of rings in different colours? All I heard about that is what Heinz Reinkemeier wrote in one of his 'Tips' pages in the catalogue from the German company "Schiesssport Stelljes". When aiming, the colored ring is pretty close to your eye. It functions as a reflection surface and thus influence your pupil diameter. A bright ring will close your pupil, a dark one will open it. If this will bring the shooter any advantage...? I wouldn't know. Jeroen Hogema (air rifle, The Netherlands) jhogema@worldonline.nl back to top^
UGX 4100- 100 = batch number ie the hundredth batch made this year on this code 4 = machine number on which the batch was made (4 machines for tenex) X = set of tooling used on the machine, approx 8 sets for tenex, This digit often omitted from batch number G = year of manufacture :- G = 2000 H = 2001 I = 2002
GROUPING LOGIC
At 50 metres bull = 10.4mm 2 bullet diameter = 11.2mm
Therefore the largest possible group size for a possible =21.6mm with no margin for error. A test group of 13.6mm will allow for a personal error of 8mm
BARREL EVALUATION AT 50 METRES
Size of Test Group 16mm = average 15mm = good 14mm = v.good 13mm = exceptional 12mm = gold medal back to top ^
My Thune jacket is currently causing me great
problems because it is riding up on my back and pushing my hat off. Mirage, My findings - so far! You are right that one tends to forget to ask at the time and consequently pays the price for not delving into all those differing ideas at the one place. Seeing mirage is half the battle! Seeing the value of the fall of shot is secondary to seeing the direction and magnitude of the mirage. The bigger the scope the more mirage you see. Focus inside the 50m such that you can still see where the shot went on the target but it is a little blurred. What this is doing is focusing the 'air' between you and the target. You can still see the hole in target and tell whether it is somewhere in the middle. Multi shot targets can be a little bit of a problem here though. Using the target black as a reference watch for the edge of the black 'shaking' or 'shimmering'. Which edge indicates the way the air is drifting. The edge which shimmers is the 'down wind' edge. The upwind edge tends to be smoother and the shimmering is hidden by the target black. The top edge will shimmer when it is 'boiling'. Boiling is when there is mirage (usually plenty!) and it is calm with no drift. If there is distance behind the target, ie the target is half way down a 100m range for instance, then one can focus on the target OK and use the mass of air between you and the 100m to get a handle on the mirage. By looking past the target you can see the air itself seeming to drift in the direction of the mirage. Effect of mirage on fall of shot. The mirage tends to move the image of the target in the direction of the drift. The consequence is that if you fire on the image the fall of shot will move in the same direction. If it is boiling - somewhere upwards (more on this later). If the drift is towards the left slightly(!) then the shot will fall 10 to 11 o'clockish. Likewise to the right 1 to 2 o'clockish. When the mirage is drifting things are going on that someone without a scope can't see. The flags almost certainly won't be moving. If you watch the mirage building up from calm the mirage moves long before you see any flag movement. It is extremely sensitive to detecting air drift. You can see that if you just watched the flag and assumed there was no 'wind' then the drift alone can move the shot to both sides of the bull and upwards. As the drift builds up to a breeze and the flags start to move then there is a point where the mirage tends to move more horizontally. I then begin to use the flags as the indicator. Shooters I have talked to who have shot for a while tend to wait for the mirage to be 'blown away' to shoot. That is all well and good for a breezy country like New Zealand but it sure as hell doesn't work for continental and hot climates. The breeze just does not get up. Remember, between the slow drift and a breeze the mirage is moving upwards towards the left or right. The consequence is that for a L to R breeze the 10 -4 wind drift tends to be nullified by the slightly raised mirage image. For the R to L breeze the 10-4 wind drift is accentuated. That is the bullet rise from the wind drift is added to the mirage image lift. Thus the shot seems to go further out. If there is preferential mirage to shoot on then it has to be L to R. A little bit of windage sideways is all that is required. Now the 'calm' mirage. The sensitivity of the mirage to the slightest drift can have a frustrating effect on your shooting. The slightest change in direction of the drift can send the shot upwards and seemingly randomly left or right for no apparent reason. In times of boiling mirage one needs to get well in tune with the cycle of drifting so that you can anticipate when your picked sight picture is coming on and which direction the slight drift is going. One trick to see the effect of mirage is to mount a telescopic sight with crosshairs and aim it at a target in the early morning when no mirage is present. Then watch as it comes in. The distance the target appears to move can be frightening to watch sometimes. But the effects and directions of the mirage can be seen easily. Ross Mason
Polarizer's are one of the best inventions since sliced bread (wholemeal of course). A previous contribution alluded to the fact about the filters eliminating reflections. They are useful for "seeing fish below the water". The effect is not quite so pronounced in shooting because the reflected light off a vertical target is nowhere near as polarized as light reflecting at a shallow angle off water for instance. But there can be an improvement in the contrast of the target image in some cases. These seem to be bright days with a bit of haze around. Placing one filter in the eyepiece cuts the light by a little more than 50 %. That is, around 45% of the light gets through. this is because the polarizer only lets through half the light - only the light "vibrating" in one plane. When 2 polarisers are placed so that they are aligned about 40% of the light gets through. Once one filter starts to be rotated the light is progressively dimmed to practically nothing. So the filtering effects are thus: No filter - 100%; one filter - 45%; two filters - 40%; then everything down to 0%. Getting back to the contrast improvement. By putting one filter in the eyepiece and then rotating, it will enable you to see if there is any polarized reflections off the target. Rotate for 'best' contrast. If the filter is still too light then bring the other one in and align it parallel ie max light throughput - Do not move the first one. Then adjust the second one for the brightness you require. To see some good anti-reflections effects, try looking at sunlight being reflected off car bodies. Use your Polaroid sunglasses for this and rotate them around and notice the considerable effect they have. Reflected light can be practically fully polarized at one special angle. This is called the Brewster angle. Remember the first BIG Lasers that were around? they had "Brewster Windows" on the ends of them. This was to enhance the polarisation effects of the laser. There is an Anschutz Eyepiece with polarizer, adjustable peep and coloured filters available (Gold paint on it) I had one once - it got wrapped up in a paper towel for transporting and was mistaken for a wrapped apple core!!!! Oh dear...The thing I liked about it was the iris peep was nearest the eye. No change of eye relief compared to the type where the filters etc are stacked on the back of the iris. Regards Ross Mason back to top^
Reference tightness of prone position, I have found that less tight is better. I teach the cadets on the team here at West Point that, when building a prone position, start with a loose sling and then tighten it until it provides just enough support to take over from the muscles. In my experience, unnecessary sling tightness causes undue pain, especially during a UIT prone match. Undue pain makes it very difficult to relax and concentrate. An overly-tight sling also causes shot-to-shot variations in angle of recoil, as you noted. Because of the tightness and the pain, small variations in the muscles become hard to detect. Just as a bright light shining in your eyes makes it difficult to see, a painfully-tight position dulls your kinesthetic sense. A sling that is just tight enough will keep the so rifle steady that the only perceptible motion comes from pulse, but will not cause pain in the short term (20 shot target), or in a series of short-terms (1600 prone match). A little pain during the last several shots of a 60-shot UIT prone match is inevitable with any prone position. A comfortable prone position is especially important for 50 foot shooting, where the shooter must change point of aim every shot. All that moving around requires that the shooter really be able to feel their position each time they move. A too-tight position, combined with the moving, can mask lots of inconsistencies like cheek placement and butt position in the shoulder, causing several 9's every target. If your position is truly comfortable, you should shoot 100's all the time at 50 feet. At 50 metres, you should be able to wait out changes in the wind without ever thinking that you'd like to hurry up and finish so it stops hurting. In conventional prone, you should be able to go back and forth between the sighter and the record bulls repeatedly and know that the moving is not causing variations in angle of recoil. I don't understand the "bruised shoulder" part. The should relax into the rifle, the rifle should not be so long that it pushes the shoulder back. The right butt plate allows the shooter to feel that it's in the same spot every time, but it should never hurt.
Should we aim to lower the > strength of the heartbeat by staying unfit and having a rate of 90 - 100 > bpm? The latter being easier, with training sessions at the pub rather than > the club. According to a research study carried out in Belarus in the early 80's, the probability of achieving a higher result in rifle shooting is directly related to the ability to fire during the diastolic phase of the heartbeat. I can hardly imagine a rifle shooter trying to catch the short interval having a rate of 100. The error proneness of such technique is obvious. Plain statistics, nothing more. There is another aspect of physical fitness, in my opinion more important for the competitive performance: the aerobic turnover. Physical training improves the ability to supply the organism with oxygen and you need much of it during a training or match. As a result (after you are physically fit), you get better vision, shorter reaction time, better concentration and other neuropsychological processes improved. Anything that puts your lungs in a better shape would do: running, badminton, football (ehhh.... footy), endurance swimming, cycling, rowing... Forget about building up strength, concentrate on your endurance. And after the exercise, why not heading for a pub? Beer is an excellent supplier of all you have lost during the training (water, carbohydrates, trace elements, B-vitamin...) I am not aware of the quality of Australian beer, but here, in Central Europe, it is proven to be working :-) Hope this helps Jaroslav Liptak [Editor - I like that philosophy. <g> Just don't go shooting after visiting the pub! 8^) ]
I don't know how relevant this may be but the American Rifleman ran an article, years ago by Gene young, regarding the barrel twist in .32 S&W Long. The standard twist is 1:19 " They tried 1:16, 1:12, & 1:10". The 1:10" was best, with the 1:12 a close second. Even the 1:16 improved on the 1:19. There was also precision chambers and crowning of the "new" barrels. The Greenhill formula recommends a 1:14 for .22 rimfire. (150 divided by the length of the bullet in calibres and multiply by the nominal calibre) Apparently Anschutz had done experiments with rifle twist when they brought out the 2000 series, but they found that the 1:16 was overall the best for 50m target shooting. Hope this adds to the info It would be nice to get collated info on this, rather than anecdotal, but who has the deep pockets? back to top^
Note with interest the
recent " What should I torque my XYZ to?". The issue of torque settings is
an interesting one and the transfer of numbers amongst shooters concerns
me. As a worker in the New Zealand National Standards Laboratory I am
forever coming across instrumentation that people believe produces Gospel
numbers. Once these are "calibrated" one finds that they can be reading
all sorts of garbage. For instance our records suggest that upwards
of 20% of thermometers are outside of manufacturers specs. And people rely
on them! I can believe the figure would be true for other instruments -
including Torque Wrenches. It seems that every engineer "believes" that
his micrometer, ruler, caliper and torque wrench is right. Dangerous
assumption.
Your hypothesis is 80% correct. However taken from a physical standpoint, the timing is correct and from the psychology standpoint the timing is incorrect. Research has proven that (and this applies to all precision shooting (shotgun, pistol and Rifle)) the shot must be taken within the first two seconds or less of the firing sequences. Experience shows that the trigger is pulled within the 3/4 of a second to a point of 1 and 1/2 seconds of reaching position and sight alignment. The human cognitive system is designed to operate on the 1/2 to 3/4 of a second time frame. Anything thereafter is within the deterioration phase and therefore the longer (5 to 6 seconds or longer) the hold in position without firing the greater the deterioration in hold and the shooters ability to hit the centre of the bull upon firing. The shooter common senses acknowledges the rapid loss of shooting position and attempt to snatch or jerk a shot before the position is totally destroyed. The shooter must look at it this way. The first two seconds is a bull 10. Every 1/10 of a second thereafter is less than the 10. Then a score of 9, then 8, then 7 and so on. As the shooting position deteriorates, the muscle system is activated to maintain the shooting position and when this happens the shooter will find the cognitive abilities deteriorating as the mental can not overcome the muscle tensions and stresses required to overcome the position deterioration. The tension and stress in muscles causes lactic acid to be generated further causing muscle calamity. Lactic acid can be eliminated with intake of new oxygen. And, the shooter has stopped the breathing cycle until the shot is fired (5 to 10 seconds or longer for non mental shooters) and this is time that the shooter does not correct the lactic acid unbalance or elimination of waste gases from the system with breathing. So now you can see the problem the shooter has with excessive hold in position for each shot and incorrect timing of the shot.
Follow these guidelines for the Prone Position for Free and Standard Rifle: (based on the case of a right handed shooter.)
|
| Formulae for finding the apparent size of the aiming mark at 25 yards. |
| X=SR(A)/d |
| Where x = apparent size of aiming mark |
| SR = sight radius |
| A = diameter of bull at 25 yards |
| d = distance from target (25 yards in mm (22860)) |
| so with a standard sight radius of 840mm between sights+ distance to eye, |
| say 60mm = 900mm |
| x = 900*50/22860 |
| = 1.96 |
| so with a black of 1.96 mm - hole of 3.8 mm this gives total white of 1.9mm, |
| = 0.95 each side of black diameter, therefore a ring width of 1mm will give a |
| good balance. |
| using 6 in tube (152.4mm) |
| x = 1050*50/22860 |
| = 2.3 |
| so to keep balance - black = 2.3mm - hole = 4.3 gives (4.3-2.3=2.0) so still |
| have same amount of white as 3.8 but black appears bigger, so probably |
| worth increasing ring to 1.1mm. back to top^ |
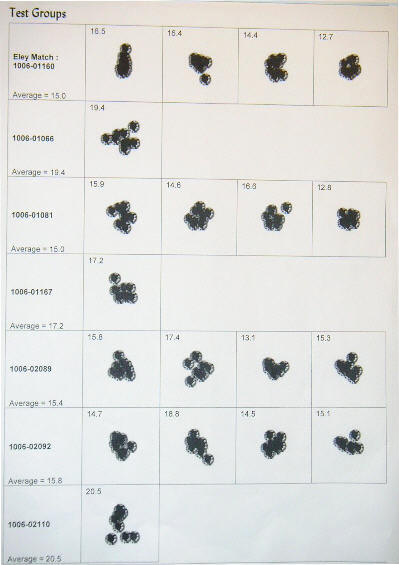
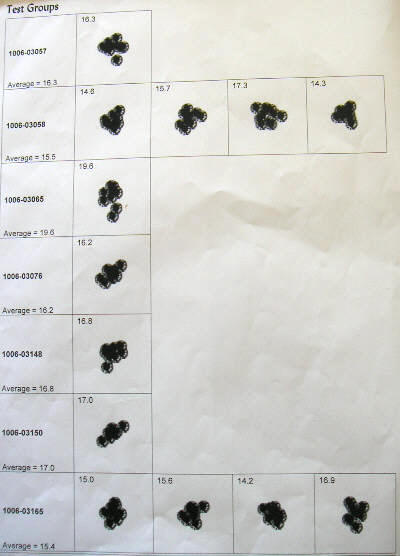
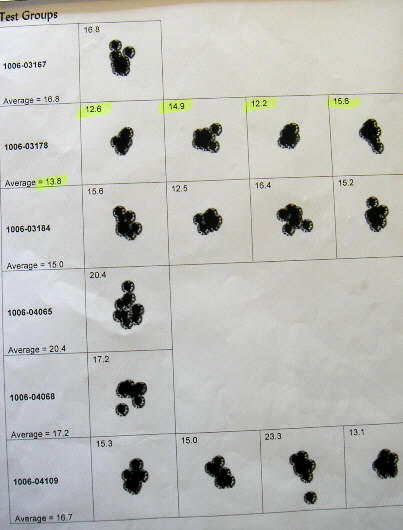
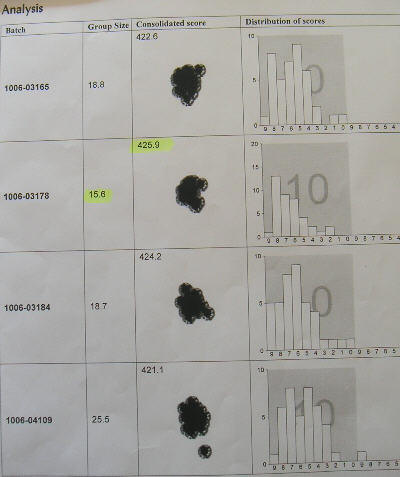
| Eley Ammunition Test |
| The Eley test can be viewed as three separate stages. |
| Stage 1 |
| A control group is set up by 2 * 10 shot groups from ammunition brought to Eley |
| by yourself, obviously it is best to take stuff in your opinion that is shooting well. |
| Eley offer 19 batches of Tenex to test, from each of these a 10 shot group will |
| be recorded. |
| Stage 2 |
| Two more 10 shots groups are shot from control to ensure consistency. |
| Looking at the results all batches above 16mm will be rejected, this should leave |
| about 8 batches to retest, from each of these a further 3 * 10 shot group will be |
| registered. Below is example of results from stages 1 and 2. |
 |
 |
 |
| Stage 3 |
| The resultant 4 * 10 shot groups of each batch are overlaid to ensure each 10 * shot group has a common centre, analysis can now be done to ascertain the |
| best batch. Below are a set of results related to stage 1 and 2 above. |
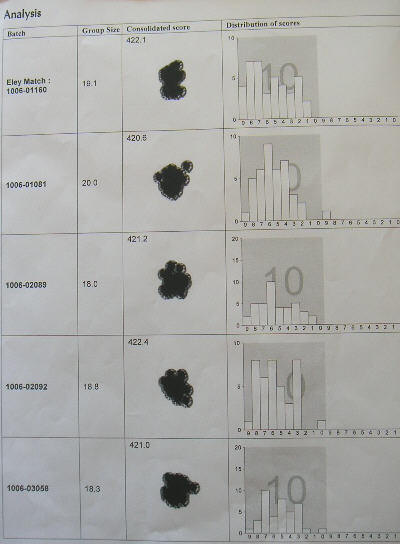 |
 |
|
Listed below are some of the most used NSRA Rules and
Penalties: p7.3.3 p5.2.1 p5.2.2 p5.2.3 p7.6.3.2 p7.4.4 p7.10.1 p7.4.5 p7.8.3 |